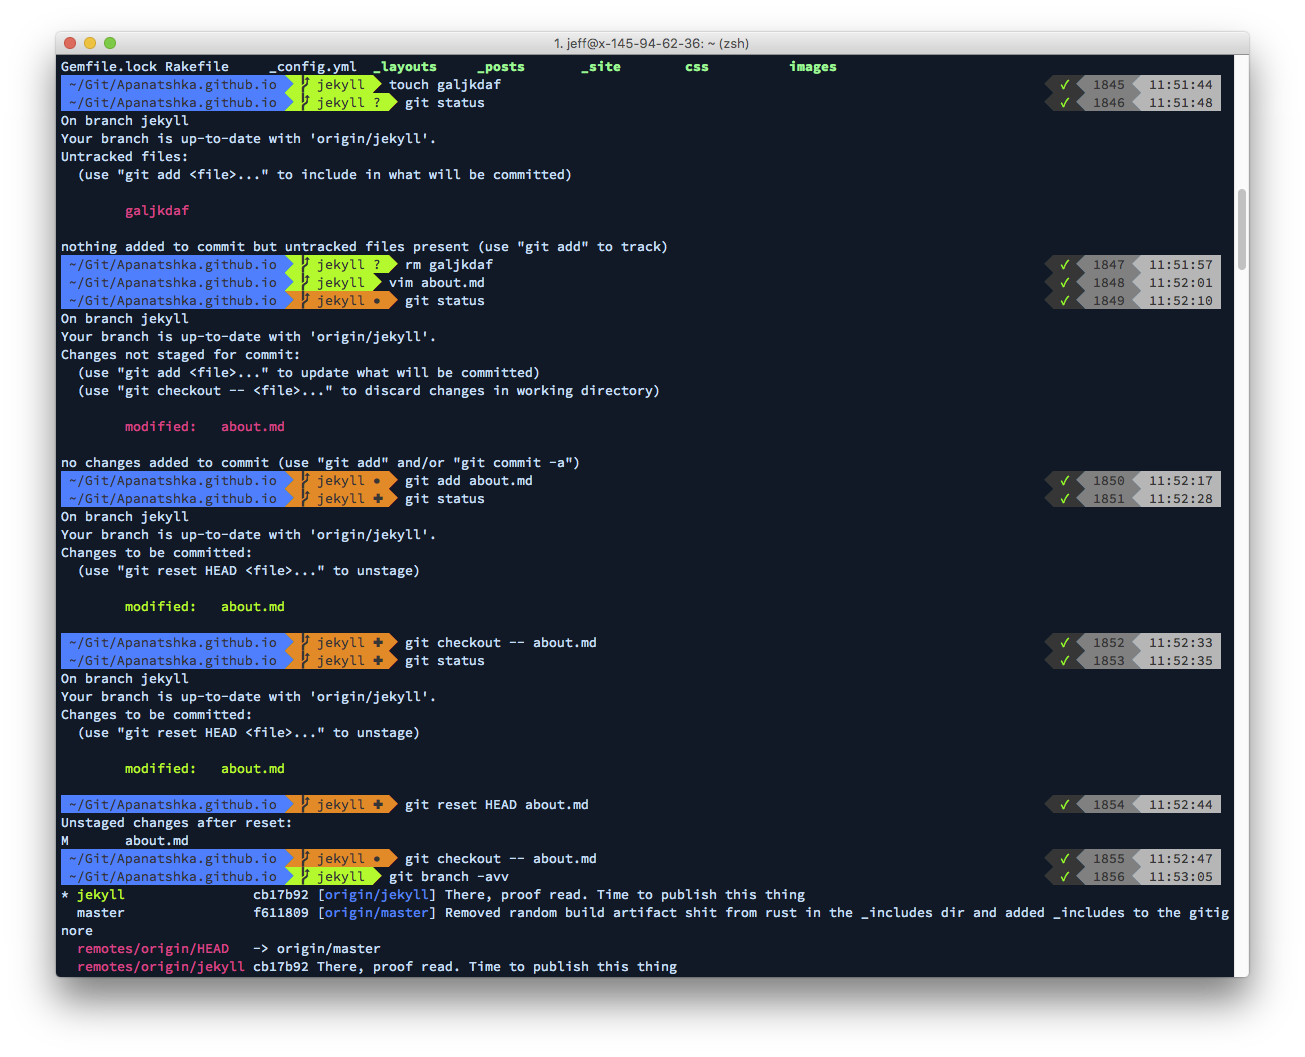
This is just a short post about my new terminal setup. I think it’s both pretty and useful. For example, it gives me the current time and info about version control when I’m in a directory with vcs:

Skip to the end for terse instructions/commands for mac and linux.
Terminal
First off, you need a good terminal emulator that can handle 256 colours. Try echo $TERM. If it returns xterm-256color you’re good. You can use a script like this to get an overview of the kinds of colours that are in your current theme.
But I don’t get xterm-256color
OK. Well, if you’re only linux, you terminal probably supports it, so look up the best way to set it to 256 colours. It might be just in the terminal settings, or the internet may advice you to put TERM=xterm-256color in a profile or rc file.
If you’re on a mac, Terminal.app is not going to help you with 256 colours. What I did was install iTerm2, which I’m happy with.
Colour scheme
Since we’re talking colours anyway, let’s see about that colour scheme. I use the colour scheme aci from Gogh. I installed the colours manually rather than downloading the script. I suspect it only works on linux anyway. For mac users that decided on iTerm2, I exported the aci colour scheme after setting it up, so you can download it here.
Shell
The theme that I use is a theme for zsh. So instead of the standard bash shell, you’ll need to run zsh. Now zsh can be customised a lot with plugins and you’ll probably want to use a system that handles those plugins for you. I use oh-my-zsh, but there are at least two other popular systems.
Theme
The theme is called powerlevel9k and it’s based on (ideas/symbols from) a Vim plugin called powerline. I use the standard configuration of the theme, but you can completely customise the information that the theme shows you. Do note that you need a special font to show the symbols in the terminal!
To make sure powerlevel9k doesn’t show redundant information, set DEFAULT_USER="<your-username-here>" in ~/.zshrc. You can echo $USER to get your current username.
Font
I use the font Source Code Pro in my terminal. The theme does require special symbols, but on linux you can just install the powerline fonts via your package manager. On mac the easiest option is to install the patched font (font + relevant symbols) that you want to use in your terminal.
Tl;dr
Linux
-
Install oh-my-zsh:
sh -c "$(wget https://raw.github.com/robbyrussell/oh-my-zsh/master/tools/install.sh -O -)"If you added you own stuff to
~/.bashrcor~/.bash_profilenow is the time to copy that to~/.zshrc. -
To set
zshas the default shell everywhere:chsh -s /bin/zsh -
Install font(s) using your package manager. Search/install the powerline font or patched powerline fonts. Or:
git clone https://github.com/powerline/fonts.git ~/powerline-fonts
cd ~/powerline-fonts && ./install.sh && cd - && rm -r ~/powerline-fonts
Set the font in your terminal settings. I use Source Code Pro for Powerline.
-
Powerlevel9k theme:
git clone https://github.com/bhilburn/powerlevel9k.git ~/.oh-my-zsh/custom/themes/powerlevel9k sed -i 's:ZSH_THEME="robbyrussell":ZSH_THEME="powerlevel9k/powerlevel9k":' ~/.zshrc -
Set
xterm-256colorand default user (so powerlevel9k doesn’t show redundant info):echo "# First thing to change is the TERM variable if [[ -e /usr/share/terminfo/x/xterm-256color ]]; then export TERM=xterm-256color fi DEFAULT_USER='$USER' " | cat - ~/.zshrc > /tmp/out && mv /tmp/out ~/.zshrc -
Gogh aci colours:
wget -O xt http://git.io/v3Dlm && chmod +x xt && ./xt && rm xt
Mac
-
Install iTerm2:
brew cask install iterm2
open iterm2
If iterm2 wants to update, do that, currently
brewhas version 2.3 whereas version 3 is already out.(or just do the graphical download/install)
-
Download this, type command+i (⌘+i), navigate to Colors tab, click on Load Presets, click on Import, select the downloaded file. Now click Load Presets again and select
gogh-aci. -
Install fonts:
git clone https://github.com/powerline/fonts.git ~/powerline-fonts
cd ~/powerline-fonts && ./install.sh && cd - && rm -r ~/powerline-fonts
Set the font in your terminal with command+i (⌘+i), select font, pick a font that ends with “for Powerline”. I use Source Code Pro for Powerline.
-
Install oh-my-zsh:
sh -c "$(curl -fsSL https://raw.github.com/robbyrussell/oh-my-zsh/master/tools/install.sh)"If you added you own stuff to
~/.bashrcor~/.bash_profilenow is the time to copy that to~/.zshrc. -
Powerlevel9k theme:
git clone https://github.com/bhilburn/powerlevel9k.git ~/.oh-my-zsh/custom/themes/powerlevel9k sed -i 's:ZSH_THEME="robbyrussell":ZSH_THEME="powerlevel9k/powerlevel9k":' ~/.zshrc -
Set default user so powerlevel9k doesn’t show redundant info:
echo "DEFAULT_USER='$USER'
" | cat - ~/.zshrc > /tmp/out && mv /tmp/out ~/.zshrc
Windows
Sorry, but I don’t develop on windows. I think you can probably reuse most of these instructions if you can get a proper terminal emulator. Or you could switch to a linux or whatever ¯\_(ツ)_/¯